Sunday 30 December 2012

Wiring diagram


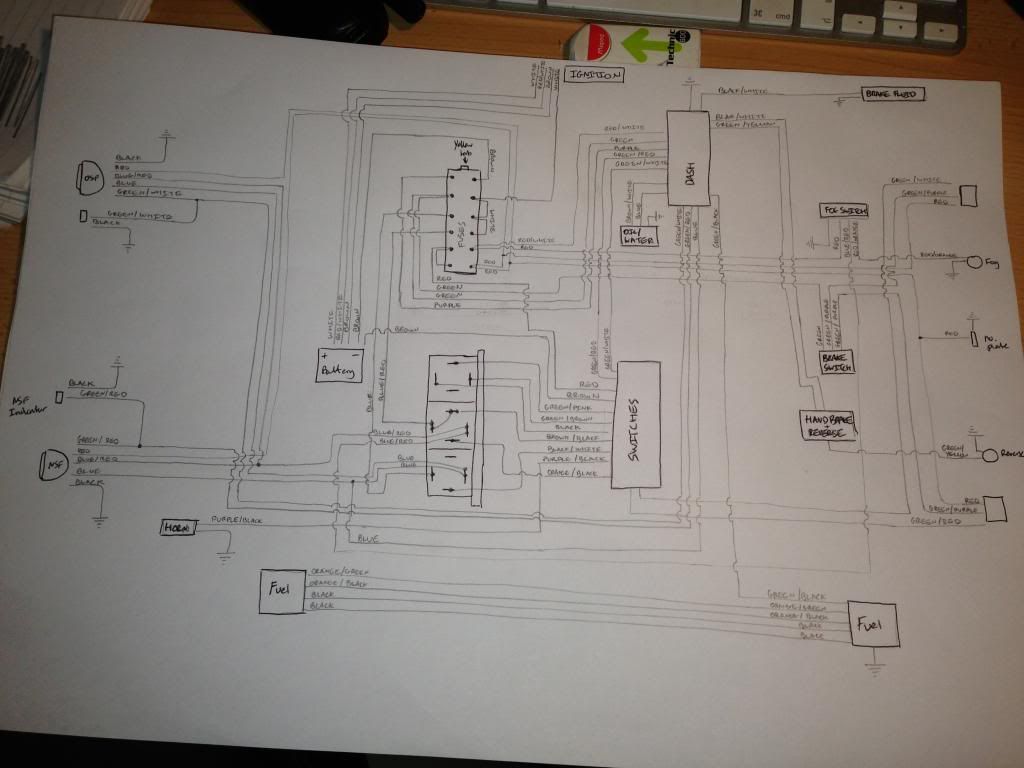
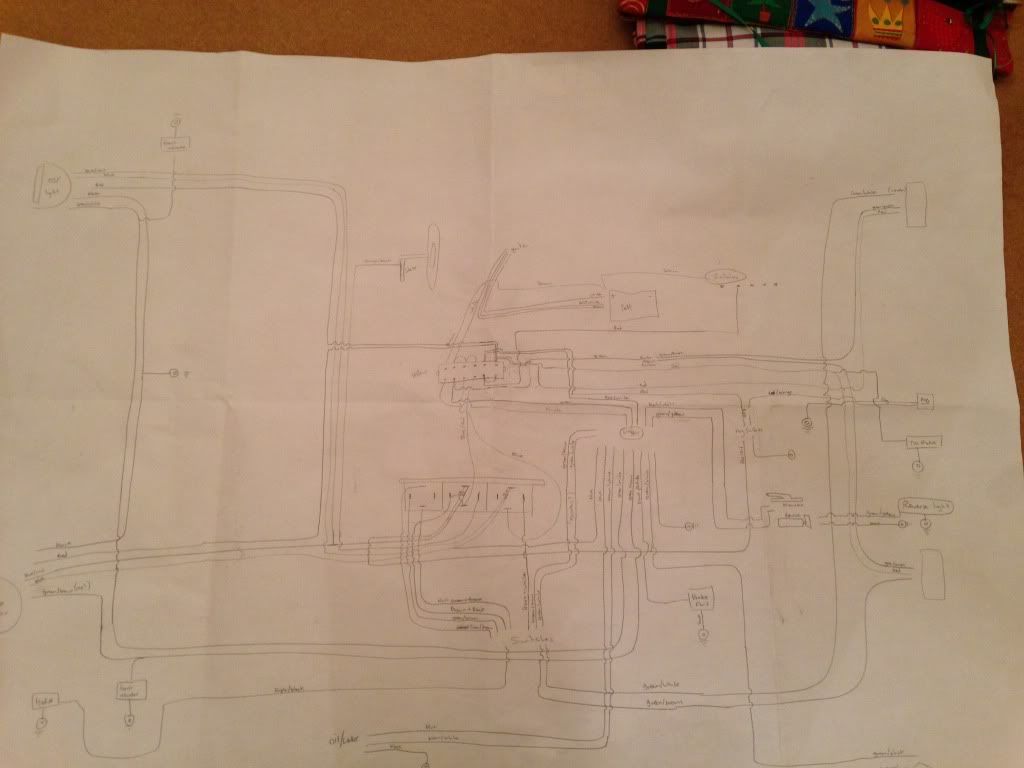
I spent a couple of hours redrawing the wiring diagram so that it should be easier to read.  All wires are shown vertically or horizontally now and each wire is labeled with its colour.  I would like to get this drawn up on computer if possible so I have it for future reference but that depends on what time is available.

I also had a look at the side panel template that I got my brother to draw up on the computer.  Two of the holes need moving a few millimeters and then the template will be perfect.


Saturday 29 December 2012

MK Wiring loom


Looking at the wiring loom was very daunting and I didn’t know where to start with any of it.  Yes, there were a few labels on the loom but it didn’t show what wires were going to where and neither did the Vicki Green loom diagram MK supplied me.

I sat down in the kitchen with my dad for about 4 hours and, using a multimeter, proceeded to identify where each cable runs and draw it on a diagram.  This process has definitely helped my understanding of the loom and now it doesn’t look quite as intimidating, although I have several questions for MK when they are back next year.

MK loom laid out on drawing

My drawing - first draft!!


Friday 28 December 2012

Fitting clutch cable, ECU and rectifier


After looking at MKs latest track day car I could see where the best position for the loom would be; this is between the engine and the cradle.  I also found the best positions for the starter relay, ECU and rectifier so I made some brackets from aluminium.


Bracket for ECU

ECU in position

Rectifier bracket

Brackets mounted to chassis

I also installed the clutch cable.  To do this was simple using the MK supplied kit but I am not keen on the grub screws in the clevis and nipple along holding the force of the clutch.  I plan to redo this when I shorten the cable and loop each end back on its self and secure with a 3mm wire clamp.


Plastic top hat tapped to M6 - this fits into the tube through bulkhead for clutch cable

Put in drill to sand down - slightly too big to fit in the tube


Thursday 27 December 2012

Another trip to MK


Decided to head up to MK to collect the wiring loom drawing I had been waiting for.  I also got a cardboard copy of the side panel cutting template and purchased the accelerator and clutch cables.

I wasn’t 100% happy with the cardboard template (not neat enough for me!!) so I asked my brother to draw it out on CAD so I had nice straight edges to work to.

Wednesday 26 December 2012

Relay mounting panel under scuttle


Today I riveted the relay panel in and had another play with the wiring loom.  Still waiting for the drawing which I should be collection tomorrow.  I also re-riveted the fuel pipe after the minor adjustment for the gear lever.

Thursday 20 December 2012

Gear linkage


I had a go at getting the gear link installed tonight.  The push pull cable was easy enough to install.  I routed it between the engine and passenger side bulkhead and then down the tunnel above the propshaft.  The rose joint lines up with the passenger side of the gear lever, which meant it, would clash with the copper fuel line.  I needed to drill out a couple of rivets and lift the fuel pipe 30mm higher.  This allows the rose joint to be fixed in the correct position.

This was only a test fitting as I'm sure it will need removing at some point soon.


Clash with fuel pipe

Fuel pipe lifted 30mm